Followers

Friday, 11 January 2013

Works in progress

Good evening all.  Tonight I wanted to update you all on a couple of things Mrs. P's Nail Potions is currently working on and will hopefully be available in my etsy shop soon.

First up is a really cool "mood potion" polish.  It changes colour with the temperature of your fingertips like the old-school mood rings used to do except it only changes between two colours, not several like the rings.  It's technically a thermochromic polish but "mood potion" sounds so much cooler LOL.

I introduce "Gold Digger".


This is my first mood potion but I do plan on creating many more.  Gold digger changes from a blackened gold when cold/cool to gold when hot/warm.  You can see the difference in the two colours in the photo above.  Thumb and index finger are cold and the remaining three fingers are warm.  Please ignore the rainbowy bits on the index and middle fingers as I just quickly swatched a coat of Gold Digger over my current mani at the time which happened to have Follow The Rainbow on the accent nails and it showed through the coat of Gold Digger a bit.  I didn't do a true mani at the time as I was just testing out the colour change.


Above is how Gold Digger looks when completely cool.  It's slightly more black in real life.  It is actually almost a perfect match to Butter London Wallis when it is completely cool.


Above is how Gold Digger looks when totally warm.  It is very gold when it is warm.


Above is how Gold Digger looks while it is in transition between warm and cool.  Depending on how long your nails are as well, sometimes the tips of your nails that extend past your fingertips will remain the cool colour giving you a sort of french manicure look but without any effort!

Gold Digger is not yet for sale in my shop.  I am currently sending bottles out to various bloggers for reviews and swatches and their opinions before I release it to the general public.  I have not decided on an exact release date yet as it depends when I get all the swatches and reviews back from my fellow bloggers.

If you are a fellow blogger and would like to sign up to receive future Blogger Promos please go to my Blogger Promo Signup Form and fill it out.

The other thing I am currently working on is a water-based polish.  This is my first water-based polish.  The difference with water-baed polish versus regular solvent-based polish is that the water-based polish is chemical free.  So there are no fumes while working with this polish and it is safe to use on kids.  However, because it is water-based and does not have the same solvents/chemicals as conventional polish, the dry time is a little longer and it does not dry to a high shine or glossy finish.  It will dry to a more matte finish but with a good top coat the high shine or glossy finish is easily achieved.  The other important thing about water-based polish is that if there are any glitters in the polish it is very important to use a good top coat to make sure the glitters adhere very well and stay on the nail.  Also the water-based polish is a much thinner consistency so glitters can sink in the bottle.  But because of the thinner consistency it is easily remixed with a good shake/roll of the bottle.

Below is a photo of the glitter mix I used for this water-based polish.  It is a mix of matte purple, blue and green medium sized hexes as well as holo purple and blue fine glitter.


Along with the above glitter mix, I added a colour shifting pigment (blue/purple/red).  When all of this is mixed together you get what I like to call "Seamonkey Dance".


Above is what a bottle of Seamonkey Dance looks like.  I wish I could take credit for this name but alas I cannot as it was all thought up by my husband!  Below is what Seamonkey Dance looks like swatched on a nail wheel.  Left is with no undies, middle is one coat over black undies and right is three coats over black undies.  To achieve the colour shift you must paint this over black undies otherwise you just get a pearly finish with flecks of the blue, purple and red.  The colour shift comes out when it is painted over black (or really any darker polish).  You could paint it over navy or a super dark purple I suppose but some of the colour shift would probably be lost as it is not a totally neutral base.  The black polish does not have any of the blue, purple or red in it so it easily shows the entire colour shift.  As you can see that the more coats you use the more of a colour shift you will see.  And as you ca imagine, colour shifts are difficult to capture on camera so the colour sift is much more visible in real life.


As with Gold Digger, Seamonkey Dance is not yet available for purchase in my etsy shop.  I am currently gathering bloggers interested in testing this out in order to get opinions and swatches prior to releasing it to the general public.  If you are a fellow blogger and interested in testing my first water-based polish out please fill out the Blogger Promo Signup Form.  Once I have had a sufficient number of bottles sent out and tested and swatched I will decide on a release date and that will be announced on all my social medial outlets.

So what do you think of these works in progress from what you have seen in this blog post?  Please feel free to comment or ask any questions, feedback is always welcome.

Pretty & Polished Haul


Today I bring you my recent haul from Pretty & Polished, three polishes from the upcoming Save the Dauphine collection and the True Blue Duo.

Let's begin with the True Blue Duo.


closer up bottle shot
This duo consists of two blue polishes which are both equally stunning on their own but together they create a fabulous manicure!  The base polish (left in photos above) is "Sea Spray" which is a deep blue jelly with a scattered holo.  The glitter topper (right in the photos above) "Bubbles" is jam-packed with various blue and iridescent glitters in a clear base.  You can purchase a mini duo for $8.50 USD or a full-sized duo for $18.00 USD.  You can also purchase "Sea Spray" individually for $4.25 for a mini bottle or $9.00 for a full-sized bottle, and "Bubbles"individually for the same price.  I had so much fun with this duo and actually after all my swatching was done I wished I had saved this duo for last so I could have worn it longer instead of taking it off right away in order to continue swatching the rest of the polishes.

Sea Spray is absolutely beautiful on its own without adding the glitter topper.  The formula was perfect and I could have gotten away with just one generous coat for full opacity, however, I went with two decent coats to make sure I had good coverage and add a little more depth as the base is more of a jelly finish.  You can never go wrong with more holo layers LOL ;)


I then added Bubbles and as if Sea Spray wasn't gorgeous enough on its own, Bubbles just amped it right up!!  This glitter topper would be fabulous over any shade really.  I'm thinking I need to try it over black perhaps and maybe even over a pastel purple or something like that.  Something to really add some contrast.  But Sea Spray and Bubbles are definitely the perfect combo if you're looking for a sparkly and cheery intense blue mani.  I only needed one coat of Bubbles over top of Sea Spray.  I did not use a top coat as I was swatching many polishes and would be removing this right away (much to my dismay!) As always, the formula was a dream to work with.  No need to fish for glitters or place glitters.  Just nice even, normal brush strokes and everything disbursed easily and evenly.  This duo is very similar to the Happy Holodays duo that Pretty & Polished came out with for Christmas 2012.  You can still purchase the Happy Holodays duo, although it will be discontinued once it is out of stock, and you can find my review of the Happy Holodays duo here.


Next up is three polishes from the upcoming "Save the Dauphine" (Marie Antoinette) collection which will consist of 4 polishes.  I only purchased three as "Louis Louis" was just not my personal taste.  The other three polishes which will be in this collection are (left to right in photos below) "Hameau", "Let Them Eat Cake" and "The Diamond Necklace Affair".  The Save the Dauphine collection will be released on January 16, 2013.


Let's begin with The Diamond Necklace Affair.  This was the one I was most anticipating out of the collection.  It is so spectacularly sparkly and radiant it is unbelievable!  The Diamond Necklace Affair was an incident that placed blame on Marie Antoinette in a crime against the Crown Jewellers.  This is a glitter topper which is so full of "bling" it is unreal.  It's a sea of pale blue iridescent glitters of various shapes and sizes.  It is in a clear base despite the look of the pale blue base of the bottle.  This polish literally sparkles like a diamond.  I did three coats just on its own as I wanted to see all the bling without it competing with anything else and again, no top coat.


Before I removed this completely, I started fresh on my pinky and ring finger and used a base of Essie Lilacism and then did one coat of The Diamond Necklace Affair.  This was really stunning but unfortunately I didn't capture it so well on camera.  My natural day light was fading as I was doing all these manicures and I just couldn't get the light quite right.  But it really was pretty and this would be fantastic over any pastel base polish.  I think it would also be spectacular over black and I'm dying to try that!  As always, the formula was perfect and there was no need to fish for or place glitters and everything applied nice and easy and even with normal brush strokes.


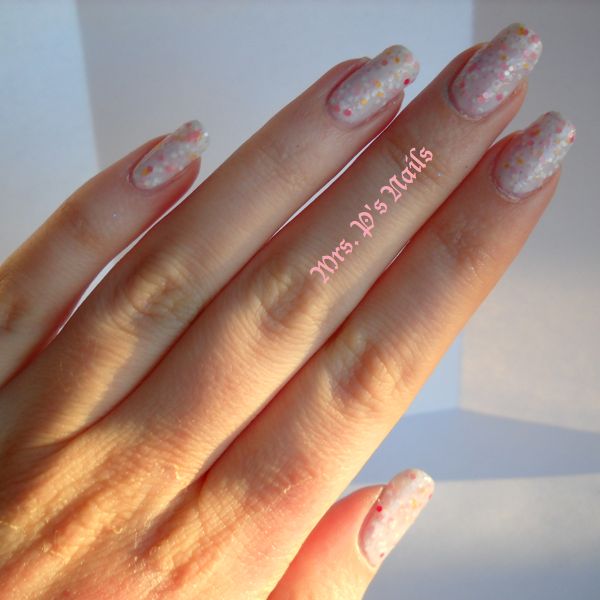
Next up is Let Them Eat Cake.  "Let them eat cake" is the traditional translation of the French phrase "Qu'ils mangent de labrioche", which is rumoured to have been spoken by Marie Antoinette upon learning that the peasants had no bread.  The name for this polish is absolutely perfectly fitting.  It's like a birthday cake or cupcake on your fingertips.  WHO DOESN'T LOVE THAT?!  Chels Marie (owner of Pretty & Polished) was going for a look of rich cake filled with creams and berries, something that may have been made for Marie Antoinette during one of her parties.  Although this polish appears pink it is a white base.  There is a ton of fun glitters in this polish in white, yellow and pink in different sizes and shapes.  This polish just makes me think of sprinkled cupcakes with loads of icing.  It's girly and sweet and actually ended up being my favourite of the collection.


You may get sick of hearing me say this but YET AGAIN the formula was perfect.  I used two generous coats and again no top coat for these photos.

Lastly we have "Hameau".  Hameau is the cottage built by Marie Antoinette.  Chels Marie made this polish to resemble the colour of the cottage and the surrounding flowers.


The base is a beautiful pale nude colour and has what I want to call a subtle champagne shimmer to it.  The description on the Pretty & Polished website actually says it's a light brown but also notes that it reads more of a neutral skin tone than brown.  It's loaded with green and purple hex glitters which spread nice and even over the nail with normal brush strokes and no fishing for glitters.  Again, perfect formula.  As this was the last polish I was going to swatch I did a proper manicure out of this and cleaned up my cuticles more and used a top coat.  I used two coats of Essie To Dry For after using two coats of Hameau.  The only reason I used two coats of top coat is because To Dry for is a thinner quick dry top coat and I just wanted a little extra gloss and smoothness.  Not that the polish had a super rough finish on its own but it was slightly bumpy simply because of the hex glitters.  I liked this polish because of its uniqueness as I've never seen anything like it and I like the shade of it with my skin tone. If you take a look at the picture of Hameau above and then the swatches of the polish below I think you'll agree that Chels Marie hit the perfect note with the colours.


Here you can see a bit of that champagne kind of shimmer I was talking about.


There is a fourth shade to the Save the Dauphine collection which I did not get.  It is called "Louis Louis" and was made to represent King Louis XVI of France.  It is described on the Pretty & Polished website as "a sheer golden polish packed with golden flakes, round red glitter, and blue glitter.  To achieve full coverage with this polish you are going to need around 4 layers."  To see photos of this polish and a couple of swatches you can click on the link at the beginning of this description and it will take you to this polish on the Pretty & Polished website.

Again the Save the Dauphine collection will be available on January 16, 2013.

You can purchase Pretty & Polished polishes from the following websites:

http://pretty-polished.myshopify.com
http://www.etsy.com/shop/PrettyandPolished#

Well that is all for now.  Hope you enjoyed my swatches and my review.  Please feel free to comment or ask questions.  Which of all of these lovely polishes is your favourite?

Wednesday, 9 January 2013

Pink & Bling!


Good afternoon all! Today I bring you probably one of my absolute fave manis of all time. As you know, holographic nail polish is all the rage right now and I think we all know why. If you have eyes and can see, you can tell exactly why. A little while ago I bought the entire Color Club Halo Hues collection from Nail Polish Canada and have not yet tried any of them...UNTIL NOW!

no flash
How gorgeous is this?!?!  It screams bling and super girly to me which is probably why I love it oh-so-much LOL.  I achieved this look using Cloud Nine from the Color Club Halo Hues collection which is a pinky holographic polish and then I used Dollish Polish A Peachy Princess from the Super Mario Bros. collection on my accent nails.

with flash
You can see the holo goodness of this polish with the naked eye but when you use a flash you can really see the rainbow flare created by the holo polish.  These are the best holo polishes and I've only used this one on a full manicure, the rest I have just swatched on a nail wheel but even on the nail wheel they DO NOT disappoint.

no flash


As mentioned above, this is the most spectacular holo polish.  Almost puts a spectraflair top coat to shame!  The formula of Cloud Nine was perfection!  It applied so easily and actually was opaque in one coat.  But I used two coats just to make sure I had good coverage and a ton of holo goodness :)

with flash
Here is another shot with the flash again and as you can see the holo rainbow is just to die for!!!

no flash
As mentioned above, I used Dollish Polish A Peachy Princess on my accent nails (middle and index).  Actually on my other hand I did my pinky and ring finger as my accent nails.  Which you can see in the very first pic at the top of this post.  A Peachy Princess also had a beautiful formula.  I've never been disappointed with Dollish Polish formula wise.  This is a pink tinted base with lots of pink glitters in various shapes, sizes and finishes.  And I didn't have to fish for or fight with any glitters.  Just normal brush strokes got good even coverage and I didn't have to place any glitters.  It's very bling bling and placed over a holo polish it's almost blinding!  I did one coat of A Peachy Princess over top of Cloud Nine.

I cannot wait to try all the rest of my Color Club Halo Hues polishes!!!!!!!!!

Like I said, I purchased my Color Club Halo Hues from Nail Polish Canada however there are many other retailers that sell this collection online and in store.  I cannot recall what I paid for the entire collection but Nail Polish Canada sells each polish individually for $10.00 CAD.  If you purchase from Color Club directly online they are selling each polish individually for $10.00 USD.

As for my bottle of A Peachy Princess, I actually got it from a nail gal pal of mine that I follow on Instagram and am friends with on Facebook.  She had only used it once or twice and was selling it so i bought it off of her because as you know, Dollish Polish polishes can be difficult to come by at times.  However, you can buy this from the Dollish Polish website directly obviously and it is sold for $8.75 USD.  You can also purchase Dollish Polish from overallbeauty.com and shop.llarowe.com.  

What do you think of this manicure?

Tuesday, 4 December 2012

Pretty As A Peacock 2.0

Good afternoon all!  Today I have another Pretty & Polished review for you with a little added twist of my very own Mrs. P's Nail Potions.  If you recall, I released a polish a month or so ago called Pretty As A Peacock which is a mix of various gold, teal, blue and purple glitters (original blog post here).  I love anything and everything peacock so when I found out that Pretty & Polished had a polish called Pretty As A Peacock as well I had to have it!!  It is completely different from my own but I thought it would be fun and very pretty to combine the two peacock polishes for a manicure.  Hence Pretty As A Peacock 2.0!

Pretty & Polished's Pretty As A Peacock is described as "a dark emerald green base packed with blue, teal, purple, and green glitters."  I found upon application that the base was almost like a metallic finish even.  It's a very gorgeous combination and very peacock-y.  The application was very smooth and I got quite good coverage in just one coat, however I did use two coats (except on accent nails which was just one coat) to make sure I had a nice deep colour.  This polish could have applied very sheer in a thin coat and could probably be used as a layering polish over other colours if you did very thin applications.  On the accent nails (ring and middle fingers) I did one coat of Mrs. P's Nail Potions' Pretty As A Peacock over top the one coat of Pretty & Polished's Pretty As A Peacock.  The combination turned out fantastic and although they are both inspired by the colours of a peacock you can see how very different the polishes are.  So really the only thing similar is the name!

A few days later I decided to change up this mani a little bit and I applied Butter London's Matte Finish Shine Free Top Coat.


I am normally not a huge fan of the matte finish but in this particular case I actually quite like it and almost prefer it.  It muted the overall colour of the polishes quite a bit (especially the Pretty & Polished one) but I think it also brought out all the different colours in both polishes even more.  What do you think?

You can keep up to date with Chelsea and Pretty & Polished through the following media outlets:

Facebook: http://www.facebook.com/pages/Pretty-Polished/290891350944291

For me and Mrs. P's Nail Potions you can find all my different media outlets listed on my Contact Me page.

Mrs. P's Nail Potions is now also on Pinterest!  Username is MrsPNailPotions or you can also find it under Bree Penfold.