Followers

Saturday, 12 July 2014

Pink Sparkles For Baby Ayla - Rainbow Honey & Mrs. P's Nail Potions

Today I share with you a manicure I did recently when I found out the tragic news about one of the nail community's most wonderful and influential ladies.  Selena Ardaiz (Selena's Instagram) was pregnant with a daughter and at 38 weeks she gave birth to Ayla Estelle but she was unfortunately stillborn.  As a mother myself I cannot even image what Selena, her husband Matt, and their family felt, are still feeling, and will feel for the rest of their lives.  A parent should never have to go through the tragedy of losing their own child.  My heart goes out to them and I jumped at the chance to be part of the #SparklesForAyla campaign where the nail community banded together with pink sparkly manis in honour of Selena, Matt, and beautiful little Ayla.  Here is a look at my #SparklesForAyla mani.


I started off with a gradient on my thumb, index and pinky of Mrs. P's Nail Potions I Pink You're Hot and Hubba Mumma.  I topped the gradient with a coat of Mrs. P's Nail Potions Spectraflair 35 Topcoat.  I then did two coats of Hubba Mumma on my middle finger and two coats of I Pink You're Hot on my ring finger and topped them both off with a coat of Rainbow Honey Papillon.  Everything then got topped off with a coat of Glisten & Glow HK Girl Fast Drying & Super Shiny Clear Topcoat.


The Spectraflair 35 Topcoat muted the gradient a little bit and made it more subtle but the idea for the mani was pink and sparkly so I didn't want a non-sparkly gradient.  Spectraflair 35 Topcoat was the perfect solution to that!!!! :)


And now for the super fun part!! My fave indie brand would probably have to be Rainbow Honey!! I was sent a sample of Papillon a little while back to promote Rainbow Honey's Midnight Garden Collection. Papillon is a beautiful mix of shimmering iridescent glitters and holographic butterflies. Super cute, pretty, and girly which was perfect for this mani! Check out these macros:


All photos above were taken in natural light indoors near a window on a sunny day.  I then took the mani out to my backyard in the direct sun to see all the shimmer and glitter really come to life, and it was beautiful, as you can see:


And here are two macros of the gradient with Spectraflair 35 Topcoat in the direct sunlight, one of which is blurred so you can really see the holo flare!


There is a fundraiser In Memory of Baby Ayla to try and help ease the financial burden for Selena and Matt through this difficult time.

And be sure to check out all the amazing tribute manicures done by the nail community by searching #SparklesForAyla on all popular social media and/or Google.

The Mrs. P's Nail Potions used in this mani, as well as all other Mrs. P's Nail Potions can be purchased on etsy.

Papillon and all other Rainbow Honey products can be purchased at Rainbow Honey Cosmetics.

All my best to Selena, Matt and the whole Ardaiz family <3.


Tuesday, 25 February 2014

Cult Nails has a reward and loyalty program!!!


Great news!!!!  If you are already a Cult Nails fan you may already know, but if you are not a Cult Nails fan or customer yet then there is no better time to be one and join the cult!!!!!  They call it "The Compound Interest Program" and here are all the deets:

You can receive "Loyalty Points" - 1 point for every dollar you spend at Cult Nails and you'll get a $25.00 store credit for every 250 points earned!  Save them up, or redeem them as you earn them.  However, no points will be earned on discounts taken, tax, or shipping and handling charges.

There is also a "Refer-A-Friend" aspect.  You must first be registered on their website in order to send referrals.  Once registered, you can send your friends a referral (new customers only) and they will receive $12.00 off $24.00 or more on their first purchase.  You can email, Facebook, or Tweet your referrals.  The incentive for referrals is that you will earn a $5.00 coupon for every friend who completes an order!

If you want to get in on the $12.00 off and have not purchased from Cult Nails before, here is the link to get you started:


If you are already a Cult Nails customer and registered on their website, go to http://www.cultnails.com and sign in.  From there, look for the widget in the bottom left of the window.  Select the link, and go from there.

Happy shopping all!! :)

Tuesday, 18 February 2014

Rainbow Honey - The Kraken


Today I am very excited to bring you a review of the gorgeous "The Kraken" from the indie brand Rainbow Honey.  Just the three macro shots above are enough to see why it's so amazing!  But I'll go into a little more detail for you :)

The "actual" Kraken is a legendary sea monster of giant proportions that is said to dwell off the coats of Norway and Greenland.  The legend may have originated from sightings of giant squid that are estimated to grow 13 to 15 m (40 to 50 ft) in length, including the tentacles.  The sheer size and fearsome appearance attributed to The Kraken have made it a common ocean-dwelling monster in various fictional works, including the Pirate's of the Caribbean movie, of course.

Rainbow Honey's take on The Kraken is more gorgeous than it is fearsome, but it is just as impressive as the legends of the monstrous sea creature.  "The Kraken" is one of ten lacquers from Rainbow Honey's "Summer of 199X" collection, all inspired by the 1995 SNES hit game, Earthbound.

As described on the website, "The Kraken is a marine jelly with blue and green glow filled with glitters, shimmer, and the sea monster's own holographic Crashing Boom Bang!"  And that description is 150% accurate!

The three macro shots above show all of that jelly, shimmery, glittery goodness in all its glory at three different angles.  And this is just ONE generous coat!! Here's another macro in case the above aren't enough for you!


Now let's get down to the nitty gritty!

Like I mentioned before, this was a ONE COATER in my books.  I did a fairly generous coat but that's really all that was necessary.  NO UNDIES, just Glisten & Glow Stuck on Blu base coat and Glisten & Glow HK Girl topcoat.  Honestly, the consistency of it was a bit thicker than I normally like, however, in this instance it worked quite well.  It wasn't difficult to apply or anything and frankly if it were thinner I doubt it would have been able to get such good coverage in just one generous coat.  Also, I think that because of the thicker consistency, it wasn't super gritty in texture once it was dry so I did not need a load of top coat in order to smooth it out.  Having said that, it wasn't totally smooth on its own, but I actually don't know of any heavily glittered polishes that are completely smooth on their own.  And I reiterate, this is not a complaint about this polish, it's just an observation, and again if it weren't as thick I don't think it would work as well.  So I guess you could say that actually in this instance, the thicker consistency is a PLUS!

But enough with the chit chat, here's the pics!  As mentioned, this is one generous coat of "The Kraken" with one coat of HK Girl topcoat.


All pics were taken indoors in natural daylight in front of a window.

And as usual with Rainbow Honey, the dry time and durability of the lacquer was spot on!  I think I can honestly say that Rainbow Honey is my FAVE indie brand ever!  But there's a reason for that.  Everything from the attention to detail in the packaging of the products to the quality and results of the products themselves always amaze me about Rainbow Honey.

After wearing "The Kraken" on its own for a few days, I decided to add some nail art to enhance and change up my mani.  Plus it was an excuse to try out new stamping plates I had received (I'm now obsessed with nail stamping LOL!).  I used Mrs. P's Nail Potions Fawning For You and stamping plate PUEEN14 to create more of a scaled, sea creature kind of look.


And of course, here's a couple macros of my nail stamping.


Again the nail stamping pics were also taken indoors in natural daylight in front of a window.

I bought my very first Rainbow Honey lacquers (the Equestria collection) just over a year ago and was instantly hooked!!  I wish I could afford to buy more/ALL of them ;)  But that's why I was SOOOOOOOOO excited when I got my blogger samples from Rainbow Honey recently.  I remember pulling the bubble mailer out of the mailbox and looking at the return address and being like "I don't remember buying anything from Rainbow Honey.  Did I?"  And then opening up the package to find FREE samples of "The Kraken", "Magic Cake", "Sweet Talk", "XOXO", and the upcoming "Papilon" along with a letter asking me to try and review them, I don't think I could have been more thrilled at the time.  Nor had I ever been THAT thrilled for nail mail in a long time, and I get thrilled about almost any nail mail LOL!  So thank you to Rainbow Honey for the awesome samples!  They will be forever treasured and well used/loved ;)

I highly encourage anyone who hasn't tried Rainbow Honey lacquers yet to rush out and do so!  If you have tried Rainbow Honey but don't yet have "The Kraken", again, rush out and get it!

Sunday, 12 January 2014

First Decent Nail Stamping Attempt

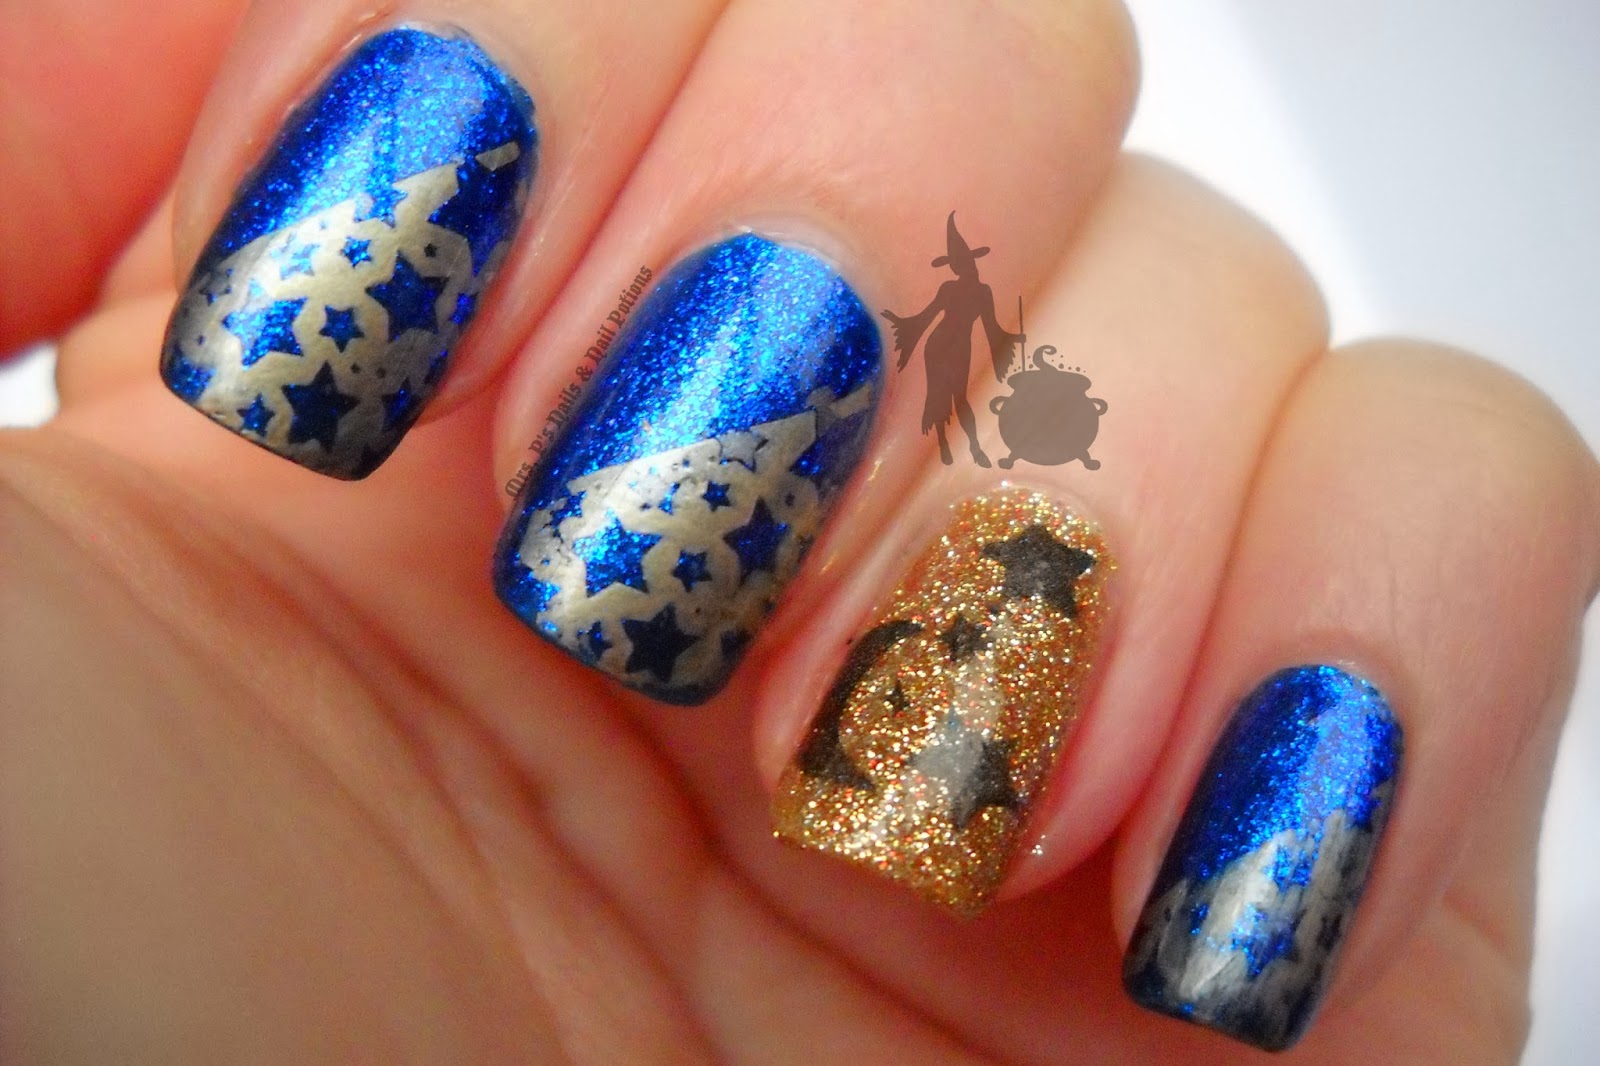
Good afternoon everyone!  Hope everyone has enjoyed their weekend so far.  Today I bring you another nail art mani I did.  This time I tried stamping!  I bought a cheap set from Dollarama a while back just to try it out, I think it was an As Seen on TV set.  I had never stamped before and didn't want to spend a fortune to try it out, as I hear it can get expensive.  So with my "resolution" to try to do more nail art this year, I sat down one night and tried my cheap stamping set out.  I had tried it long ago when I first got it but didn't give it much of a shot and I think perhaps the polishes I tried with weren't stamping friendly or something and it was an epic fail.  This time I had put more research into how to stamp properly and what products to use and I was bound and determined to make it work.  One of the plates that came in my set was a plate of 6 "full nail" designs.  I say "full nail" because they are so narrow that unless you have the tiniest nails, they would never cover the full nail.  They would cover my full pinky but that would be about it.  So I thought I'd get creative and try one using it at an angle, and it kind of worked, although placement was a bit tricky.  And I used just a moon and stars single design from one of the other plates for the accent nails.

The products I used for this nail art were:

-OPI DS Magic (used as base for stamping on)
-butter LONDON West End Wonderland (used as base for stamping on accent nails)
-Mrs. P's Nail Potions Fawning For You (used for stamping)
-Color Club Revvolution (used for stamping on accent nails)


So I first applied 2 coats of OPI DS Magic on majority of my nails and 2 coats of butter LONDON West End Wonderland on my accent nails.  I then applied a coat of Seche Vite Dry Fast Topcoat on all nails to make sure the nails were good and dry and especially the accent nails with the glitter were smooth for optimal stamping results.

I then stamped my "full nail" images on the diagonal over the DS Magic using Fawning For You.  Then I stamped the individual image over the West End Wonderland using Revvolution.  The individual image was just a moon with a couple of stars.  In order to fill the nails more I also used partials of the image to put more individual stars on the nails.  I then topped everything off with another coat of SV and was done.  I was quite happy with how successful the stamping turned out and I liked the colour combination.


And here's some macros of a few of the nails.

Check out that glitter!!!!!!
I love how shimmery DS Magic is! One of my very first favourite polishes.

After this stamping mani I was HOOKED!  And this was just cheap plates LOL.  I found though that my stamper and scraper from my Dollarama set worked well so I was pleased that I didn't need to buy new ones of those and should just be able to buy new and better plates.  I checked out Nail Polish Canada and got a few plates on sale just to try.  I ordered two Pueen plates and one Bundle Monster plate.  They should arrive Monday.  I'm so excited!!  

Sunday, 5 January 2014

Home Decor Inspired Dry Brush Mani

Good evening everyone!  HAPPY NEW YEAR!!!!  I apologize for my absence in my blog posts over the last couple months.  Things got kind of crazy business-wise over the fall and the lead up to Christmas.  And then I basically took the month of December off from the business to spend every moment I could with my husband and children with no distractions.  It was a nice break, especially after the hectic retail season I had.

But I'm back now and one of the things I would like to do for the new year is do more blog posts and more regular blog posts.  Fingers crossed ;)

One of the other things I would like to start doing more of this year is nail art.  I used to do quite a bit before my business started and then when the business took off and I was doing shows and parties, I didn't really find or make time for nail art.  Now I'm no expert but it was fun to do some of the more amateur techniques and it always made for more interesting manicures.

So in an effort to start the new year off right, I am doing this blog post to show you my first nail art of 2014!!  This is my very first attempt at the dry brush technique and I'm quite pleased with it actually.


So as you can see I did the dry brush technique on my index, middle and pinky fingernails.  I had 3 coats of Hella Holo on my accent nails from the previous mani which wasn't all that old and they were still holding up, plus I didn't feel like fiddling with aluminum foil and cotton balls etc. lol, so I decided to leave them.  Blingy accent nails go with any and all manicures anyway, right?!?!

The products I used for the dry brushing are as follows (all Mrs. P's Nail Potions from the Fall 2013 Collection):


My inspiration for the look and colours of the mani was actually some new home decor pieces we had gotten throughout the fall and beginning of winter for our main floor living room:

Ottoman 
Accent cushions
Throw 

I started off with a solid base of Fawning For You (one coat) on all nails.  I then began the dry brush technique:

- Take your first colour (mine was I Guaranteal It) and scrape majority of the polish off of the brush using the neck of the polish bottle.  You can also brush most of the colour off on a paper towel but I didn't want to waste polish and I didn't find a need for the paper towel.  I was able to scrape enough colour off on the neck of the bottle to make the brush pretty much "dry".

- Once you've removed most of the colour off the brush you can gently drag it across the nail, over your base colour.  You can drag in all one direction or in several directions, depending on the look and texture that you want to create (I just did one direction).  You can use more pressure in some areas than others and build up colour in some areas and use less or no colour in others, again depending on the look you want to create.  If you find that no colour is coming off on the nail (only a little should come off) you can dip your brush again and scrape off the excess colour but maybe scrape off a little less than last time.

- Do this to each nail with the same colour until you have done all the nails you wish to have this design.  When you've done your last nail you can move right on to your first nail again with the next colour.  There is no need to wait for dry time as you have put so little polish on and not even full thickness that the polish pretty much dries instantly, and certainly by the time you have done all the desired nails.

- Take your second colour (mine was Lean, Mean & Aubergine) and apply in the same way as you did the first but not necessarily going over all the same brush strokes you just made with the first colour.

- You keep repeating these steps with each colour you have chosen to use until you have achieved a look that you are happy with.

- Once you have a look that you are happy with apply a topcoat and there you have it.

You can do this look with as many or as little colours as you want, layering each colour over the other (you can repeat some colours as well if you want).  This was my first attempt as I had mentioned earlier, and it was very easy and was not time consuming at all.  Took me no more time to do this manicure than it would have to do a simple straight forward manicure with two to three full coats of one colour.

Here are some more views:


Macro of my middle fingernail
Macro of my pinky fingernail
I love how each nail ends up slightly different.  I think next time I do this (and I definitely will do it again!) I will try doing the brush strokes both vertically and horizontally to create a hashtag and more woven type of effect.  And I'm definitely pleased at how well these lacquers worked with this technique.  If you are not already aware, Mrs. P's Nail Potions is my own brand of indie polish that I have created.  I've made all the colours in my Fall 2013 collection very highly pigmented and most can be used as one-coaters with a generous coat, or two coats max.  So they worked well with the dry brush technique as the brush strokes were still highly pigmented enough that you could see the colour that is brushed down and it wasn't sheer or anything.  I wouldn't recommend doing this technique with sheer or jelly polishes, or any other polish that requires several coats to become fully opaque.