Followers

Saturday 25 February 2012

Rainbowriffic

Good evening all!

So today I begrudgingly removed my Butter London Disco Biscuit that I loved oh so much in order to do yet another mani on myself.  I will warn any of you that use the Disco Biscuit (by itself with three coats that is) it is kind of a biotch to remove, although not as bad as glitters.  The only reason I removed the Girlicious mani so soon was not because I didn't adore it but because this was now my third day couped up in the house and I was going batty and needed something to occupy me this afternoon while Daniel was napping.  As you know I was having Devereux's "growing pains" on Thursday and stayed home from work due to the super uncomfortableness, then Friday Daniel was sick and couldn't go to daycare so I stayed home yet again.  Today there was so much snow from the three days of basically constant snowing that I can't dig out the truck or shovel the driveway on my own so we are stuck in the house still even though both Daniel and I are feeling much improved.  Major bummer!!!  Both Daniel and I were going batty earlier today and didn't have that great of an afternoon/evening.  But we got some FaceTime with Dorian/Daddy after dinner (who is sadly still stuck working out of town) which cheered both of us up and Daniel had a nice bath with lots of bubbles and we had fun with the bubbles so that cheered us both up as well.  Now that Daniel is fast asleep I can show you my mani from earlier this afternoon which I am dubbing "Rainbowriffic".
Today I used another untried Butter London, Knackered (love that name LOL) and OPI's Servin' Up Sparkle.  I did quick reviews of both of these polishes a couple days ago in my "Newest Treasures" post if you want to take a look.  I will elaborate on those as I have now actually used them more rather than just playing with them on practice wheels and I have a better sense for both of these polishes.

I started out with Knackered which is a lovely but quite sheer and almost frosty duochrome color from Butter London with fine rainbowy/holographic micro glitter throughout.  I will warn you now, the pictures do NOT do this color justice at all and you really must see it for yourself in person to appreciate it fully.  This is yet another one of my brand new favorites and actually I think it is only my second duochrome polish.  The formula was really nice to work with and although it was sheer, each coat gave good coverage.  I did have to use three coats to get full opacity though.  I suppose I could have used a solid base coat and then just layered the Knackered over top of that but I wanted the full effect of Knackered and Knackered alone.
One, two and three coats of Knackered in the daylight
Two and three coats of Knackered in artificial light
The duochrome properties seem to show up better in the daylight but you can't see the micro glitter as well in the daylight.  However you can see the micro glitter a bit better in the artificial light but then the duochrome look is somewhat lost.  This color definitely reminds me of an oyster shell.  It is the perfect way to describe it as the color shifts from greyish to green to purple.  Each coat went on like butter and each coat dried rather quickly so it actually didn't take that much time to do three coats, even with taking pictures in between each coat LOL.

Because I'm a sucker for sparkle, glitter and glam, I decided to jazz up the Knackered just a bit with a glitter gradient on the tips so as not to completely cover the Knackered but to just add a little more pizzaz! OPI's Servin' Up Sparkle was the perfect pair to Knackered as it had the same tones in the glitter, just more of it and larger holographic glitter to boot!  The Servin' Up Sparkle was your typical glitter consistency.  The micro glitter and large holo glitter in this formula are amazing as they really catch the light and are very rainbowy.  Again, pics do NOT do this polish justice.  I am not looking forward to removing this polish when the time comes and the aluminium foil will definitely be coming out but I love the final look of this mani.  I wish the sun would come out here in Edmonton so I can really see it dazzle in the sunlight.  Until then I guess I have to just love and enjoy it in the cloudy, snowy daylight and artificial light ;P

Here's the final results!
In the daylight
Another angle in the daylight
In artificial light
In the daylight 
In artificial light
Close up in daylight
As always, please feel free to leave any comments or questions.  And if you read my blog regularly please join as a follower :)  Also don't forget to ask me about cheap manis and help me gain some much needed experience before I take some classes after Devereux arrives and while I'm on maternity leave :)  Can't wait!

Now since I'm all by my lonesome again tonight, I am off to curl up with the poochies and watch some more Sex and the City :)

Good night all!

Friday 24 February 2012

Another Quiet Day at Home

So just as I was about to go to bed last night I was being called by a very upset, very scared little boy.  "MOMMY MOMMY MOMMY" Daniel screamed and cried.  I burst into his room and threw on all the lights and he was just laying in his bed rocking back and forth with his eyes closed tears and snot pouring down his face and he was beet red.  I had no idea what was wrong and went to pick him up and he was on fire!!!!!  He was so upset and scared he couldn't even tell me if anything hurt or what was wrong he just clung to me.  I snuggled him and undid his jammies to try to cool him off a bit and got him a little calmer.  He still couldn't really tell me what was wrong but I gave him some Tylenol and put a cool cloth on his forehead and snuggled him until he was ready to go back to sleep.  Once he was calm it didn't take him long to be ready to crawl back into bed.  He was like putty in my arms and really weak.  It was so sad :(  He went back to sleep no problem and had a solid sleep where I didn't hear from him until 8:00 this morning.  Obviously I was staying home from work with him today and he wouldn't be going to daycare.  It makes sense now why last night he was so tired so early and was actually asking to go to bed early and didn't want to eat supper or anything.

Today he is much improved thankfully!  His fever seems to have broke but he's still ever so slightly warmer than normal and a tad clammy.  He seems in pretty good spirits considering but is kinda lethargic and not really into playing.  He had some toast and milk this morning and is now watching "Mater and Finn" (Cars 2) and just chilling.  He seems to be left with a cold now and is very sneezy and has lots of bright green runny snotties EEEEEWWWWW!!!!!!  So staying home today and relaxing was still a good idea and hopefully he recovers fully quickly.

Thursday 23 February 2012

Girliciously Simple

Good evening again.  I LOVE this mani, even though it is so simple.  I now have a new favorite polish.  This is much simpler than the manis I've been doing as of late but it's really girly and super fun and I LOVE the colors, especially the pink!!!!!!! :D

I achieved this mani using Butter London Disco Biscuit (the new FAVE) and OPI Grape Set Match.

Artificial lighting with flash
Artificial lighting without flash
Natural lighting without flash
Artificial lighting with flash
This was my first experience using Butter London polish and I'm hooked!!!  I can't wait to try all my other Butters now and I probably won't have this mani for long no matter how much I love it because I am already chomping at the bit to try all my other Butters (see Newest Treasures post for other Butter polishes I have).  Although the Disco Biscuit was a bit thicker than I have worked with before and than I am used to I still found it rather easy to apply and didn't have to fuss with it much.  It is a fabulous hot pink jelly base with just enough subtle yet equally fabulous bright purpley blue glitter suspended in it.  Because it is a jelly it goes on rather sheer and I used three coats to get full coverage and the most opacity.  You could use this as a layering polish over top of a more solid or creme polish but I like the layers of jelly with all the glitter suspended between each layer and peaking through.  I don't think I'll ever use this as just a top coat, at least not for myself anyway.

Artificial light
Natural light
I chose to do an accent nail with the ring finger.  This Grape Set Match is part of the Serena Williams Glam Slam collection and relatively new in my collection so I hadn't used it yet until today.  I think the deep purple and the hot pink go fantastic together and the purple picks up on the purple glitter in the Disco Biscuit.  This Grape Set Match is a shimmery holographic polish that is fabulous all on its own but I got it in a set with Servin' Up Sparkle (again, see Newest Treasures post for more info).  I love OPI but I was a tad disappointed in the application of this polish.  I'll still use it and I still love the look of it but I found it really runny and thin and it was difficult to get an even coat.  I got even coats eventually but I had to use a lot of strokes to smooth it all out and make it even.  I only used two coats and got fairly good coverage and opacity.  I probably could have used three coats to be honest but because the Disco Biscuit wasn't super solid due to the jelly consistency I thought a slightly less solid look with the purple would go okay.  I will still definitely use this Grape Set Match again and won't let it's thin, runny consistency deter me at all.  

Artificial light with flash 
Natural light
As I said before I LOVE this mani.  I think it is FANFREAKINTASTIC and I love how girly and bright and fun it is.
Closeup in the daylight so you can really see the shimmer, glitter and holo in both
Please feel free to leave any comments or questions or ask about getting a cheap mani done on yourself by MOI! :) - only $5 or $10 depending on what you chose.

Stunning Silver


Good evening all.  Daniel is down for bed already (he was complaining since we got home from daycare that he was tired LOL) and I'm just sitting here lounged at the computer with a cup of tea doing this post.  In this post I bring you a mani I did on my awesome Grammy Helen last night while they were over for a visit and supper.  As you can see from the photo above we did a stunning silver mani and I achieved this look using (for the first time ever) a Gosh nail polish (Silver) with a few black and silver floral nail stickers I found at Dollarama and a little touch of Essie's Luxeffects in Set in Stone.

I was very very pleased with the quality and formula of the Gosh Silver.  It was even better on the nail than I thought it would be from looking at the bottle.  It is a foil type polish and the application was so easy and smooth and it only required ONE COAT!!!!!  I have absolutely no complaints about this polish whatsoever and would recommend it to anyone.


It's a little difficult to see here but I used a touch of Set in Stone just on the tips of the three middle fingers and I placed the black and silver floral stickers on the pinky and thumb nails.


The Set in Stone was very difficult to capture on camera as it is basically a tone on tone look and the flash just reflected off the silver polish but the Set in Stone didn't really show up without the flash.  You get the idea though.  And although it seems extremely subtle in the photos above, in person it isn't so much.  And because of the tone on tone it actually made it look like the tips where I put the Set in Stone were diamond encrusted!!  Now what girl doesn't love that?!?!?!?!

I was very pleased with this manicure and I believe Grammy Helen was as well :)

Please feel free to comment and provide your thoughts and any questions you might have.

Also, remember, if you live in the Edmonton area I am practicing and gaining experience for eventually attending a part-time manicure class while I am on maternity leave.  I need volunteers and guinea pigs please!!!!! :)  Only $5 for a simple polish change or simple nail art/details like above (I can do this on the toe nails as well but I can only paint them as I do not have the equipment nor am I set up for full pedicures).  And only $10 for a full manicure or more complicated and time consuming nail art like the Fabulous Feathers or Shimmering Sherbet I've posted prior.

Newest Treasures


Good afternoon all!  Well, I have not been able to nap but I have relaxed and chilled as well as done a new mani on myself (another post to follow this one soon).  Right now though I would like to share with you the newest treasures I have gotten for polishes over the last little while.  I haven't tried all of these out yet but I am very excited to and cannot wait to try each and every one, which made deciding on what to do for today's mani very difficult LOL.

I will go over each of these polishes in groups:

Left - Silver, Right - Miss Minty
Gosh cosmetics added nail polish to their makeup line a while ago.  While I hadn't bought or even tried any of their polishes prior I do love their makeup and use it regularly.  When I saw their polishes on sale at Shopper's Drugmart (further savings when you bought 2 or more - $5.00 each) I thought "why not!?"  The silver is a silver foil polish and like nothing I have in my collection.  I was even more pleased with it out of the bottle and in use than just looking at the bottle.  Also, it is a one coater!!!  You can obviously do more than one coat if you like but it really is not necessary with this one.

I fell in love with the seafoamy green color of the Miss Minty as soon as I saw it and could not resist, again something completely different from anything I already had.  I have not used the Miss Minty in an actual manicure yet but have played with it on a practice wheel and again it seems to be a one coater.  The formulas for these polishes are fabulous.  Not too thin or runny and they have amazing coverage.  The Miss Minty is one of the nicest creme polishes I've used/tried.  And like I said, I was stunned by how gorgeous the silver actually was when using it, never mind just looking at it in the bottle.  I haven't worn either of these polishes or used them on anyone else for any length of time as yet so I'm not certain about wearability and how long they could go without chipping but I'm really not too concerned with that as I am very happy about all the other qualities of these polishes.  I would definitely recommend Gosh nail polish to anyone!!  While a lot of their shades did not seem to be super unique (which is not surprising given how many polish brands are out there and they all repeat each other at some point really) their color selection was not too shabby and the colors were quite lovely.  There was variety in that they had cremes, pearls, foils and shimmers.  The Shoppers I was at had limited selection left so I'm sure there are tons of polishes from Gosh that I'm not even aware of, but from what I saw I didn't notice any glitters in their line.

Left - Servin' Up Sparkle, Middle - Grape Set Match, Right - Aquadelic
The two OPI polishes above came in a set.  They were part of the Serena Williams Glam Slam collection.  Servin' Up Sparkle does just that, serves up sparkle, sparkle and more sparkle.  It is a mix of several different sizes of holographic glitter and shimmer.  It's impossible to get a true sense of it with a camera and must be seen in person to really wow and dazzle you.  The fact that I'm like a raven and love anything that sparkles aside, I love this glitter and it is one of my favorites in my collection now.  It makes a killer top coat and I'm sure it would be a stunner all on its own but you'd probably have to use something crazy like 3 or even 4 coats to get full coverage since all the glitter is in a clear base.  I have not tried it on its own as I haven't wanted to fuss with the removal of a lot of glitter lately, especially with  how often I've been changing my manis LOL.

The Grape Set Match is a gorgeous shimmery holo deep purple.  I found the formula of this one to be rather thin and it was a bit difficult to get nice even coverage due to how thin it was.  I did manage to get nice solid and even coverage in just 2 coats but it took a lot of strokes with both coats and I probably could have used a third coat but didn't bother.  The Grape Set Match is a perfect partner for Servin' Up Sparkle which I'm sure is why they put the two of them together in a set!!!  But even on its own, the Grape Set Match is a stunner and another one of my favorites in my collection now, despite it's runny consistency.  It's like nothing I have already.

Last in this group is China Glaze Aquadelic from the Electropop collection.  I love this color!  I did ever since I caught wind of the Electropop collection.  I got a mini set of four of the Electropop colors but alas, Aquadelic was not one of them.  Oh well, now I have a full sized bottle of it so I have even more!!! The more and more swatches I saw of this polish the more and more I liked it.  I had ordered it before I found the Gosh Miss Minty and didn't think they were at all similar.  However, after buying the Miss Minty and then receiving my Aquadelic in the mail from nailpolishcanada.com I realized how similar they were.  I don't regret having both by any means.  They are different.  Aquadelic is a slightly greener hue and about a shade or two darker than the Gosh Miss Minty.  Could probably do a really fantastic ombre manicure with these two colors actually!! I have not yet worn my Aquadelic either but have played with it on a practice wheel and the coverage is fantastic and it is probably another one coater.  Gotta love that!!! :)

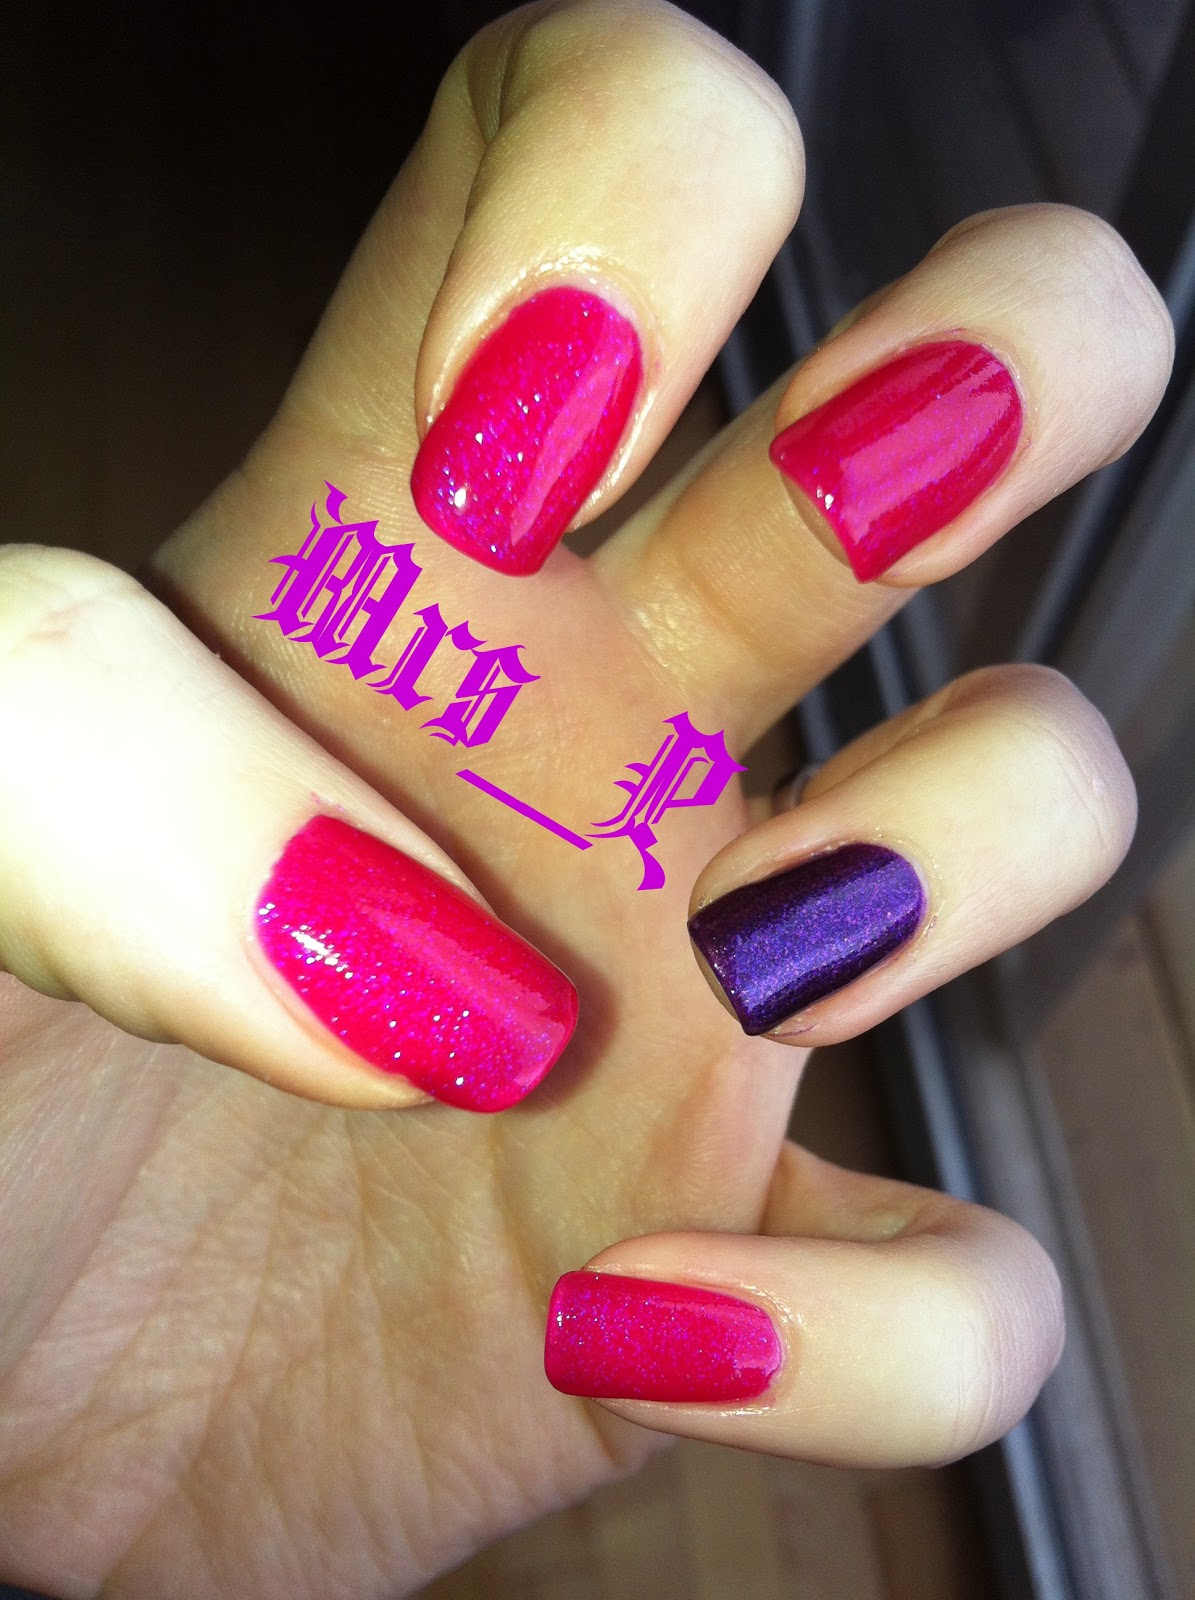
Left - Thames, Right - Disco Biscuit
And now for my crown jewels so far!!!! <3 <3 <3  I first heard about Butter London from some lovely and talented ladies I follow on Instagram.  Butters are certainly a higher end polish but you definitely get what you pay for and the colors are so unique and fabulous and can be used in so many different ways.  I'm addicted to Butters now.  The names are pretty awesome too :)  And if my husband knew anything about nail polish he would probably be very pleased that I love Butter London as he is from London and very British LOL!  To be clear, that's not why I love Butters but the Brits do know what they are doing when it comes to nail polish that is for sure!!!!!  Thames is a fantastic metallic-like shimmering peacock green.  I wish I knew about this and had this for my wedding back in October (peacock theme/colors).  I have not yet used this for a mani but have something special planned for it for a St. Patrick's Day mani in a couple weeks.  From what I've done with it on a practice wheel it is a more sheer color and you will definitely need a couple or three coats to get the opacity if opacity is what you want.  But OMG this is a true stunner and the most fabulous green!  Like no green I have in my collection and other greens will be hard pressed to match up to what I think of this one.

Disco Biscuit is easily one of my absolute favorite polishes in my collection and possibly my absolute favorite right now.  I saw it on Instagram a while ago and fell in love with it and waited for it for soooooo long.  Now that I have it it's even better than I imagined.  It's a wonderful and girly hot pink jelly base with fantastic but sort of subtle bright purpley/bluey glitters suspended in it.  IT'S FANFREAKINTASTIC!!!!!! <3 <3 <3  It goes on rather sheer so you can either use it as a layering polish over top of another more opaque or creme polish or just use three coats of it on its own which is what I did and it is worth the extra coats and effort!!!!  I don't know that I would ever actually use it as a layering polish.  I love the jelly effect when you use it on its own with all the coats and you get more and more shimmer/glitter with every coat and they shine and peek through every layer and it's just so fun and fabulous!!!!!!!!!  The consistency of this polish was a little thicker than I'm used to working with but by no means was it difficult to use or messy and it didn't deter me one bit.  How could anything deter you from this super fun, gorgeous color?!?!?! :D

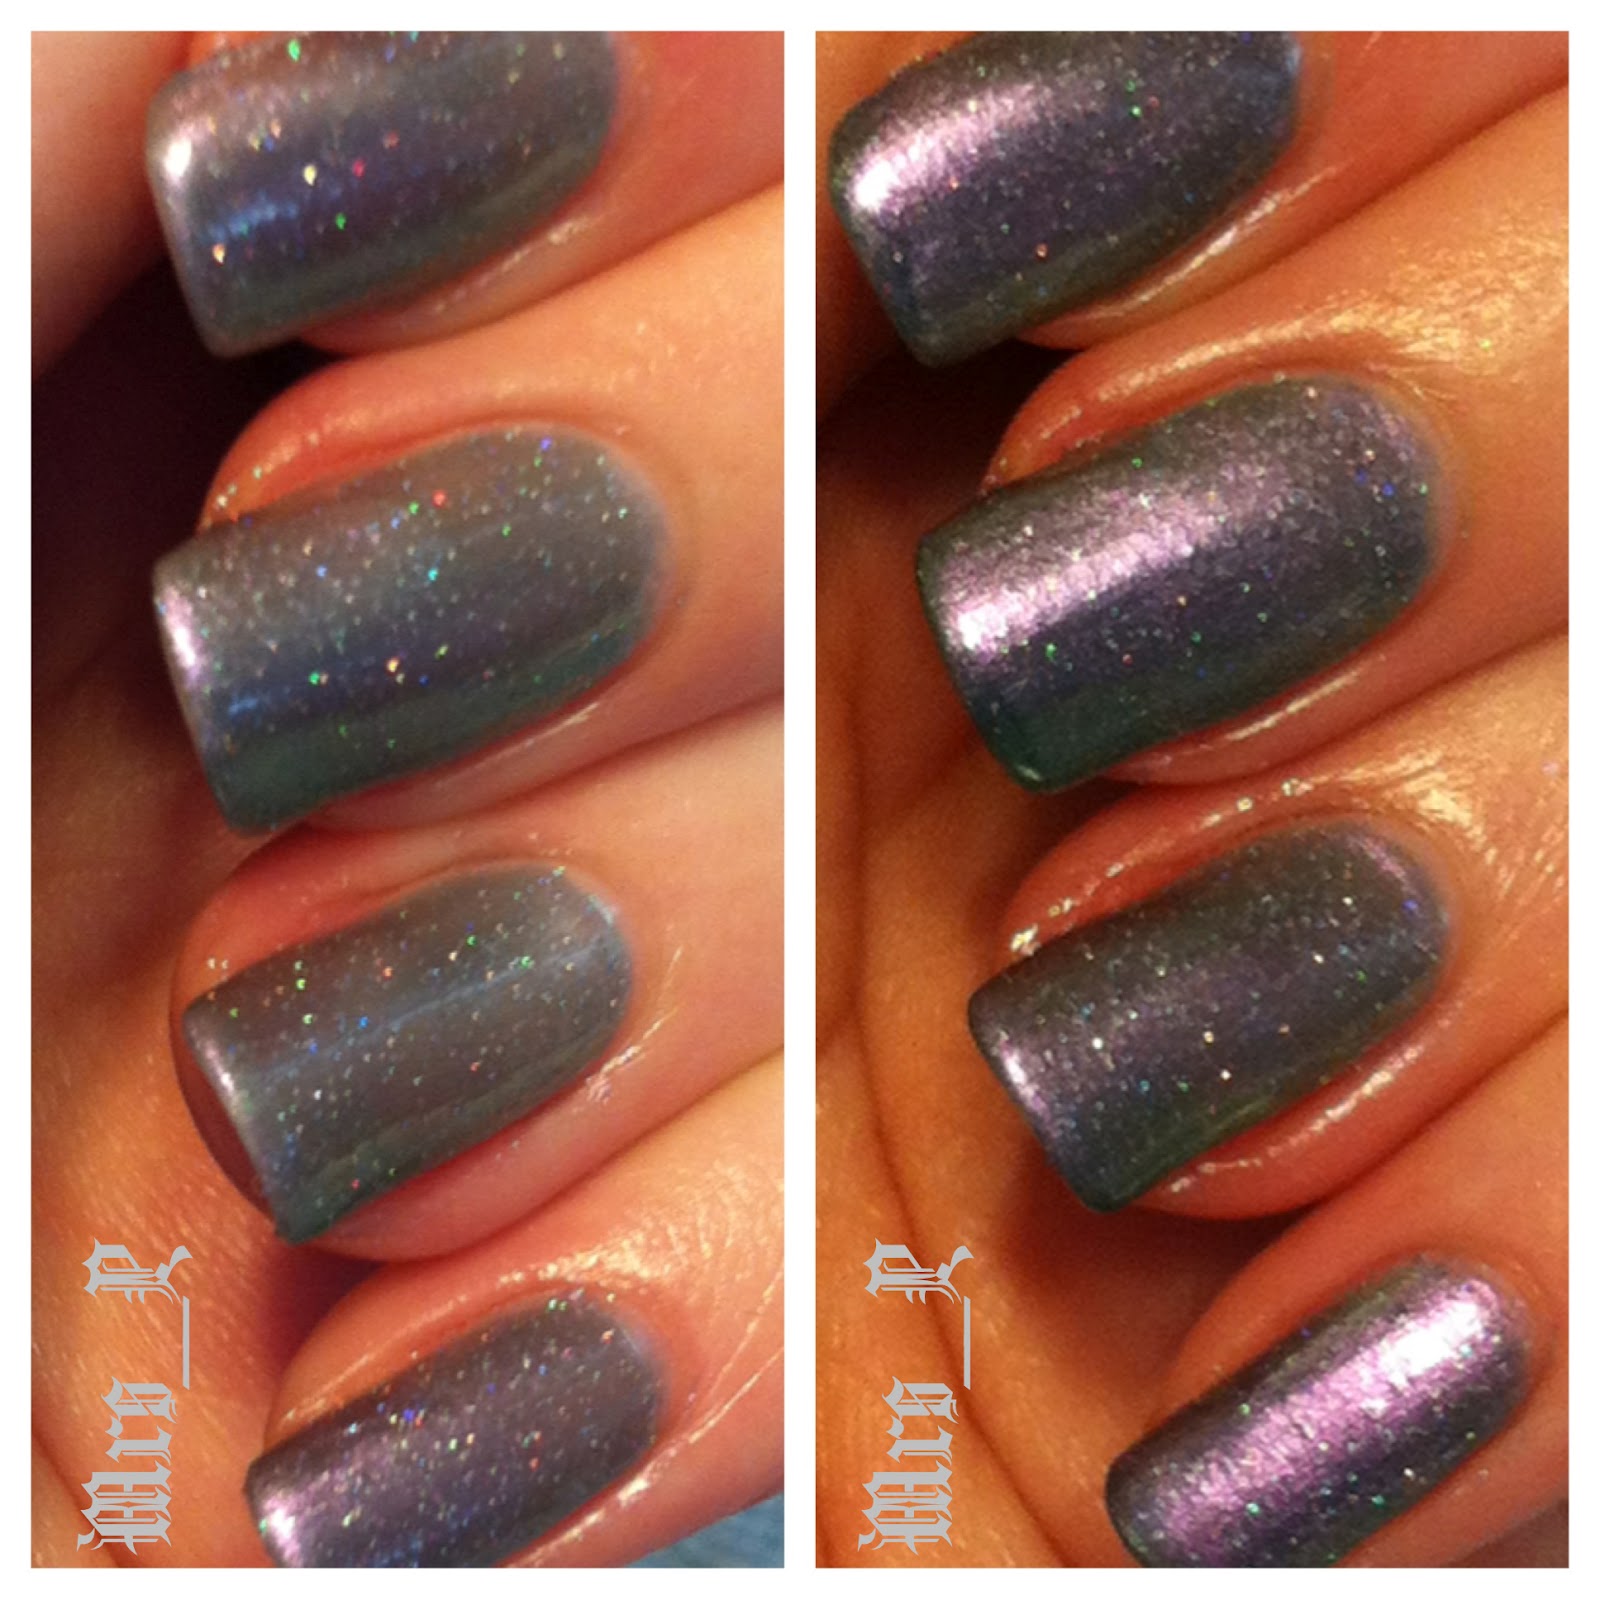
Left - No More Waity Katie, Right - Knackered
More Butters!!!!! <3 <3 <3  I can't wait to use these.  They are totally unique and so stunning in so many different ways, from each other and from anything else I own.  No More Waity Katie is actually a limited edition polish that was released in celebration of the Royal Wedding (prior to the wedding actually taking place).  It is a very different color and admittedly will not be everyone's cup of tea but it is very classy and unique and I doubt there will ever be anything else like it.  It is a bit on the sheer side and from some other reviews I have read it is a bit thicker as well and not as easy to apply as some other polishes.  I have not tried this myself but cannot wait to.  I'm very curious to see how it looks in person since it is so different.  Again, it can be used as a layering polish or with several coats you can achieve full coverage with this polish alone.  It is a purpley grey base with just the right amount of lilac glitter suspended in the base.  I cannot get over just how different it is and I'm sure I will be trying it in the very near future! :)

Knackered is also quite unique.  It's a blue, purple, green duchrome polish and the colors shift depending on the angle and depending on the light.  Plus there is fabulous fine rainbow glitter suspended in it!!!  Again, I have not tried this out myself yet but I cannot wait to.  From the little bit I have used it for on a practice wheel it is rather sheer and frosty you might say.  You would probably need three coats to get full coverage and decent opacity with this polish on its own but I'm also looking forward to playing with it as a layering polish over lots of different shades of purple, blue and green.

Well there you have it, all of my newest treasures, each one quite different from the other and several different brands but all fantastic.  Stay tuned in the future for full manis and reviews of the polishes above that I have not yet used and please feel free to leave any comments if you have tried any of these polishes yourself.

Growing Pains

Morning all,

So today I am at home.  I should be at work but am not due to what I am calling major growing pains.  As you know, I am pregnant and I am now 22 weeks.  The last day or so my tummy has been rather itchy no matter how much I slather it with moisturizers and such.  I have also been feeling like things inside are a little more jam packed than they used to feel.  I've been feeling the baby (Devereux) more and more over the last few days as well and that coupled with the itchy belly and everything else I figured he and I were in for a growth spurt.  Well, the proof is in the pudding and last night the proof began.  I woke up in the middle of the night/morning with these growing pains like my stomach was stretching immensely from the inside out.  I tossed and turned and was very uncomfy for the remainder of the night/morning and am exhausted due to this.  When my alarm went off to get ready for work I was so uncomfortable and couldn't find a good position and I was exhausted.  Devereux is definitely growing and I am definitely suffering from his growing pains I would say.  I've been told that these happen and some woman luckily avoid them and don't really feel them but this woman is not so lucky.  When I went into the bathroom I swear my baby bump was like twice the size it was when I went to bed last night and I feel "huge" compared to the last week.  So today I figured I would just take it easy at home and rest up and try to be as comfy as possible which would not be possible propped in an office chair in front of a computer all day (which is how I would be at work).  Even though I'm on the computer right now at home, I'm reclined in our luxurious desk arm chair with my feet up and I have as little pressure on my tummy as possible to allow Mr. Devereux to stretch out which is clearly what he feels he needs at this point despite my feelings towards this issue LOL.

Just thought I would give a quick update and let you in on this newest "development" in my pregnancy.  I still consider myself quite lucky during this pregnancy so far in that I haven't been sick or very nauseous at all and I don't suffer from major or really any food cravings and smells and such don't seem to phase me.  So I guess I can't really complain too much about some growing pains but let me tell you, it was not pleasant this morning and Mr. Devereux is making his presence very known today!

Well I am off to relax on the couch with my puppies for a bit and maybe drop off for a little nap.  I'll probably be back on with another post later today as I plan to do some nail painting since I'm at home and relaxing :)  Plus I did my Grammy Helen's nails last night and I have not yet had a chance to publish a post on that manicure.  So stay tuned...

Tuesday 21 February 2012

Oh to be a kid again...

Ever get jealous of a child's life and lack of responsibility and just being able to play, play, play and sleep, sleep, sleep, especially SLEEP ANYWHERE?!?!

This is my step-son Daniel.  We had left him upstairs to watch one of his favorite movies, Cars 2, because he had been such a good boy over the long weekend.  I went upstairs to tell him it was time to go for a nap and it turned out he was a step ahead of me already...
SO SWEET!  Oh to be a child again LOL :)

Shimmering Sherbet Manicure

Good evening all!  I did this manicure over the long weekend just didn't have time to do a post until now.  I call this my Shimmering Sherbet Manicure :)  A friend of mine, Yvonne, saw this and said it reminded her of sherbet and I think she's totally right!  The colors blend so nicely together and they are nice and summery and pretty much sherbet colors :)  Mmmmmmmm yummy...sherbet...DROOL! LOL.  Can't wait for summer!

Colors used for this manicure (left to right in pic above) are Essie Lilacism, Essie A Crewed Interest, China Glaze Dance Baby from the Electropop line and Essie As Gold as it Gets from the Luxeffects line (topcoat).
This is not water marbling.  This is just marbling with a generous amount of polish on the nail and using the end of an orange stick or toothpick to drag the colors through one another.
This is another one of those unique manicures in that because of the effect no nail is the same and they are all slightly different.

I'm quite pleased with how this turned out and how well the colors worked together.  Better than what I thought they would by just looking at them in the bottles.  And the As Gold as it Gets overtop just gives it a nice shimmer and extra something special :).

Please feel free to comment below if you have any thoughts or questions about this manicure or if you are interested in having a manicure done by me.  Only $5 for a simple polish change or $10 for a full on manicure with cuticle clean up etc. or for complicated nail art such as this manicure.

I am trying to gain experience and clientele.  I will be on maternity leave as of June and once my little boy is born and everything is settled again I will be taking some manicure and pedicure classes to become a certified manicurist and pedicurist and will be supplying these services out of my home.  Until then I am just trying to get practice and experience on my own, hence the cheap price.  I can do painting of toe nails as well for just $5 but cannot do full pedicures because I do not have the necessary equipment for that.  But I can paint your toe nails and make them pretty as well :)

Saturday 18 February 2012

Fabulous Feathers

Good afternoon!!  So I spent last night after Daniel went to bed fiddling with a bunch of feathers for my latest manicure.  Yes these are REAL ACTUAL FEATHERS!!!  I'm not nearly that good at nail art that I could paint something like this on my nails myself and they are not nail wraps or foils or anything like that.  I saw a feather manicure in a post of a girl I follow on Instagram on my iPhone and was immediately intrigued and excited!!  She graciously told me exactly how to do it so I thought I'd give it a whirl.  It was actually quite simple, just time consuming and a little tedious but I think well worth it!!

The feathers I used were from a package of feather picks I picked up at  Dollarama for $1.50.  It came with five different coloured feather picks and each pick probably has approximately 10 feathers on it all of varying sizes.  There was yellow, orange, red, black and as you can see from the photo above PINK! :)

If you want to try this out yourself or if you are just curious you will need feathers obviously, a nude base coat, tiny mani scissors, a nail file and a top coat.

Start off by picking your feathers and trimming them all to approximately the size of each nail.  Have them all laid out before you start because you have minimal time to place them.  As always, I started out with my China Glaze Calcium Gel Fortifier as my base.  Once that dried I started with the first nail and put on a coat of a nude base coat.  Mine happened to be the Barielle nude french manicure polish but you can use any nude polish you have.  Heck you could probably even use a coloured polish depending on the colour of your feathers.  You don't want the coat too thin or too thick, you'll figure out just the right thickness of coat as you go along.  If you have too much it seeps between the feather and muddies up the colour of the feathers but if it's too thin the feather won't stick.  Before the nude coat dries, place the desired feather in the desired location on your nail and gently tap it into place paying extra attention to the corners and edges along the cuticles.  Once it seems to be sticking fairly well use your scissors to trim the excess feather off the tip of your nail and any excess that sticks out past your cuticles.  This is the tedious and somewhat annoying part.  Again though, as you go you'll get the hang of it and this part will become a bit quicker and easier, especially when you're using your dominant hand to do the trimming etc.  Once you have the feather trimmed and the nail doesn't seem tacky anymore immediately place a fairly generous top coat over the feather being gentle not to disturb any little bits of feather that may not have entirely adhered yet.  And I say fairly generous coat because the feather will soak up majority of the top coat.  I just used a regular Color Club top coat, I'm not sure that I would recommend a fast dry top coat for this as it may not have a chance to really soak into the feather before it dries and the top coat soaking into the feather is what keeps the feather nice and secure.  Repeat these steps individually for each nail and once you have done all of the nails go back and place another 2 or 3 top coats over all of your nails.  The total number of top coats depends on the top coat you are using.  I did a total of 2 top coats after the initial top coat on each nail.  You'll have to play it by ear and just keep adding top coats until the surface is nice and smooth and shiny because the first few don't stay very smooth or shiny because most of the top coat gets absorbed by the feather.  Once everything is good and dry you may have to take a very fine file and file away at the tips of your nails a bit in case there was any excess feather sticking out as once the top coat is on the tips/ends can get a little rough and scratchy or sharp.  The feathers file down quite nicely once you have all the top coat on and it's all dry.

The results should look somewhat like this:

 And a nice close look:
I love how each nail turns out slightly differently depending on the feather and exactly how you place the feather.  You can do a slight variation of this manicure by leaving more naked nail at the base so not as much of the nail is covered in feather.  You can also play with the angles you place the feathers on the nails at.  Lots to play around with with this mani and although it was a bit time consuming as I mentioned in the beginning it is totally worth it!!

Please leave a comment about what you think and/or if you would like to have your nails done like this or any other mani I've posted.  Again, only $5 for just a polish change (fingers or toes) and only $10 for a full on mani or something like these feather nails.

Wednesday 15 February 2012

Baby Boy Blue Celebratory Mani

So as you may have read from yesterday's post, my husband and I found out we were having a baby boy!!!  So I redid my nails last night to celebrate our boy news, I just didn't have time to post the pictures last night.  Here they are:
I used a lovely blue by Zoya but again it was a polish I got from a friend and didn't have a label on it so I don't know what Zoya blue it is.  Sorry! :(  Over top of the Zoya blue I did two coats of Sally Hansen's brand new Glass Slipper.  It's a fabulous silver/diamond-like flakie!!!!!  Oh flakies, how I love thee!!!!!

The formula of the Sally Hansen Glass Slipper was fabulous.  You don't need two coats but I wanted to do two because I wanted it to be less subtle and definitely noticeable.  Regardless, the coats went on very well and finished very smoothly.  I think silver and blue is a classic combo and I'm very happy with these baby boy blue nails :)

Tuesday 14 February 2012

Best Valentine's Day Gift EVER!!!

So as I mentioned previously, my husband and I were lucky enough to be able to get our first ultrasound of our baby booked for Valentine's Day.  Not only did we get to see our baby for the first time but baby cooperated and we were able to find out the sex of the baby.  IT'S A BOY!!!!!!!  For certain!  We have a pic of his bits and pieces to prove it but I thought I'd keep the little guy's privates private ;)

DEVEREUX COLCHESTER PENFOLD will be born on or about June 29, 2012 and in the pictures to the left he is 20 weeks and 5 days old and has a heart rate of 169bpm (although that is probably slightly elevated from his normal - may have been Starbucks induced to make sure he moved during the ultrasound LOL).  Tech said he was very mobile and was a little hard to keep up with at the beginning of the ultrasound but he is very healthy and so is mommy :)

It was a truly amazing experience, my first ever - but that's not the only reason it was so amazing.  It was crazy to see him move so much (especially when I didn't feel a thing) and it feels wonderful to know that it will be a boy for certain.  We were able to finalize a name and give him an identity and I feel that much more connected to him now.  And the close ups of the tiny little fingers and toes and his heart and spine that the tech showed us were truly miraculous!

Best Valentine's Day EVER!!!!!  Aaaaaaaaaaaaaand after the ultrasound my husband bought me an awesome lunch and a MASSIVE bag of Jelly Belly jelly beans (my FAVE).

HAPPY VALENTINE'S DAY ALL!!!!!!!!!!!!!!!!!!!!!!!!!!!!!!!!! <3<3<3

Sunday 12 February 2012

Today's Mani - in anticipation of Tuesday

So as you may or may not have read in a previous post, my husband and I don't really celebrate valentine's day but this valentine's day is different and extra special because we go for my first pregnancy ultrasound and hopefully find out if it is a boy or girl.  So because we don't know if it is a boy or girl yet, I decided to do something on my nails that incorporated blue and pink but I also wanted to make sure to use one of my new Essie Luxeffects polishes since I just got them and was so excited for them and only managed to use one so far.  So I did a simple darker blue base with a shimmery Zoya polish (don't know the name because I got it from a friend who wasn't using it anymore and it doesn't have a label on it) and I put Essie Luxeffects A Cut Above overtop.  Here is the result.  I love the contrast and am very happy with these.  Can't wait for Tuesday!!!!!! :D


Valentine's Day Mani - on my Grammy Helen

So my Grammy Helen has graciously allowed me to use her as my guinea pig for manicures.  STILL LOOKING FOR OTHERS PEOPLE!!!  ONLY $5 FOR A POLISH CHANGE ON FINGER OR TOE NAILS AND ONLY $10 FOR THE WHOLE MANICURE WITH CUTICLE CLEAN UP ETC.  Anyway, I digress...

Here are pictures of the valentine's day nails I did for Grammy using China Glaze's new spring 2012 Electropop Dance Baby and Fuchsia Fanatic.  Please feel free to comment or ask questions.


Best Nail Treatment I've Come Across

So this is China Glaze's Calcium Gel Fortifier.  If you're looking for a really good nail treatment that is easy to apply and makes a big difference in the strength and condition of your nails then I would definitely recommend this one!  I used it for the very first time on my Grammy Helen the other day and she said the very next day she couldn't believe how much stronger her nails felt.  She had some minor splitting at the tips of her nails and a few were a little soft/weak.  This treatment seems to have masked all of that and made quite a difference for her.  I used it as a base coat to her manicure/nail art I did for her and the nail polish seems to have stuck just fine to it, no different than any other base coat (which is the one thing I was a little worried about).

I just removed my nail polish yesterday and put this treatment on my own nails (have not had a chance to paint them yet but that will change...very soon! LOL).  I can't believe how much stronger my nails feel after having had it on for less than 24 hours.  I only applied 1 coat because I was planning to use it as a base coat but if you are using it as just a nail treatment you are supposed to apply 2 coats to bare, clean, dry nails and repeat every four days for four weeks.  I'm just using it as a base coat as my nails are not that bad but the tips are a little soft/weak from when I had my gel nails and where some of the gel pealed off it probably took a small layer or two of my natural nails with it.  But I tell you, this stuff is like a little nail miracle in a bottle.

I have to be honest, I can't compare it to really any other nail treatment as I have not used anything like OPI's Nail Envy or anything like.  I was using Sephora by OPI's Strengthener and I didn't notice a difference.  It just seemed like a basic base coat to me.

If you ever try this nail treatment I would love to hear from you.  Please leave a comment on this post and let me know what you think/thought.