Followers

Thursday, 4 April 2013

Daytime Golden Glam

I thought I would share one more makeup look with you.  I call this my daytime golden glam look.  I do this when I want a little more drama and to amp up my daytime look a little but not have super heavy makeup or major dramatic smokey eyes etc.  I also like this because it gives me a nice sun kissed or bronzed glow.

I start out with the same "canvas" as my 5 minute face, using Maybelline's Dream Fresh Beauty Balm and Covergirl's Advanced Radiance pressed powder all over my face.  I then fill in my brows with my eye brow pencil and curl my eyelashes.

I then take my kabuki brush and apply a dusting of bronze pigment on my forehead, bridge of my nose, cheeks and chin, making sure to blend very well and starting with just a little bit so that it doesn't look unnatural or like I over did it on the self tanner lol.  Essentially I am using this as a bronzer.  A little bit goes a long way and you can always add more, whereas it is difficult to take away if you put too much on in the first place.  This loose pigment I am using is by Lise Watier.  I do not recall the name and the name on the bottom of the container is rubbed off and illegible now.
Once the bronzer is applied I apply a highlight just under my eye brows, on the inside corners of my eyes and on top of my cheekbones.  For this look I'm using the lightest shade in this Gosh trio of eye shadows.  It's like a shimmery champagne colour with some super fine subtle gold glitter.
Then on the inner half of my eyelid I apply a very gold shimmery pigment. This one is Lise Watier and it is called Folie 24 Carats.
On the outer half of my eyelid I apply the darkest shade in my Gosh eye shadow trio.  It is a bronzey dark brown with the same super fine subtle gold glitter as in the highlight shade.  When doing this you have to make sure to blend the two colours together just enough.  You want the colours to read separately but you don't want a harsh line where the two colours meet in the middle of your eyelid.
I then take one more brown colour, a medium brown, and rub it into the crease. This brown is chalk-full of gold glitter which works very well with all the other golden, glittery, shimmery shades I used.  It is by Nars and it is called Galapagos.
I then take a very black eyeliner and run a fairly prominent line along my lash line and wing it out at the outside corners just a bit.  I do not have a photo of my eyeliner as it is very well used and I am almost in need of a new one.  Due to that fact, it is just a short stub of a pencil and there is no writing left on it. But I believe it is Loreal and it is the pencil eyeliner that applies like a liquid liner.

I then apply my tried and true Maybelline Falsies mascara in black drama on top and bottom lashes.
And I finish off with my usual Nars blush in Outlaw on the apples of my cheeks.
Again, I leave my lips very natural as I played up my eyes and I don't like to bring too much attention to too many facial features.  The key is to just pick one feature and play that up.  If you are going to play up your lips then you would do a very simple eye.

And here is what it all looks like when put together.


My "5 Minute Face"

Today I have something different for my blog post.  I thought I would share with you all my "5 minute face" that I do practically every day.  Being at home with the kids now and not having to completely do myself up every day to go into the office anymore my makeup routine has drastically changed.  I very rarely put on my "full face" anymore and it's all much more about simplicity and being more natural.  On days that I know I am staying home and not leaving the house I don't bother with any makeup in order to give my skin a break, but when I'm leaving the house, whether it be to run some errands, meet a friend for coffee, or visit with family, I like to do a little something with my makeup just to make me look a little more fresh and polished.

For simple, everyday makeup I have done away with the foundation.  I now use a beauty balm which has many more benefits for my skin and just gives a nice light coverage while moisturizing and protecting my skin all at the same time.  The beauty balm I have chosen to use as of late is Maybelline's Dream Fresh BB.  It is an 8-in-1 beauty balm with SPF 30.  The price is pretty decent and it is easy to find at any drugstore makeup section.  I love the formula as it goes on nice and smooth and actually feels very refreshing on my face as I apply it.  The lightest shade is the perfect match for my skin tone and it evens out my skin tone just enough for everyday use.
Next I use a pressed powder all over my face to set my beauty balm and give a nice matte silky finish all over.  I'm not too picky about my powder.  I actually tend to buy what is on sale at the time, but I do pay attention to the formula for oily/combination skin as I do have oily/combination skin.  The one I am using currently is just Cover Girl Advanced Radiance.
I then use a brow pencil and fill in my brows just a bit.  The hair on my brows is rather thin (as is my actual hair) and as a result my brows look rather light.  I like to use an auburn/brown shade to fill them in a bit more and make them a little more prominent in order to frame my face/eyes more.  And because I have my hair dyed a dark red once my brows are filled in they "match" my hair colour better.  Again I am not that picky about my brow pencil and I tend to just pick something that is on sale at the time.  I did not take a photo of my current brow pencil as it is getting down to the end and what's left of it doesn't have the brand or anything written on it anymore so I didn't see a point in photographing it and I actually don't remember what brand it was anymore.  Brow pencils last me quite some time.  I then quickly curl my eyelashes with an eyelash curler.

Once those basics are done I then apply a highlight in 3 key places: under my eyebrows, inside corner of my eyes, and on top of my cheek bones.  This gives some dimension to your face and makes you look awake and alive and gives you a little glow.  I like to use a loose Annabelle pigment in Prism which is white powder with a nice iridescent/pearl finish.
Next is eyeliner.  Since I don't use any eyeshadow for my "5 minute face" I like to bring a little colour on to my eyes with my eyeliner.  I like to use a deep plum colour personally.  I love purples and I find that using purple on my eyes brings out the green in my hazel eyes and makes them appear more green.  Plus it gives enough dimension and brings enough attention to my eyes but it's not as stark say a black liner would be but it's more fun than just a plain brown liner.  I actually quite like Cover Girl's Liquilineblast in plum.  It is a pencil but goes on nice and easily and smoothly with the same intensity as a liquid liner.  I run a fairly dark, prominent and defined line along my top lash line only and wing it out just a little bit at the outside corners of my eyes.  The wing gives a little bit of interest and drama to the look but it is still simple and kind of understated.  I like to make it a little more prominent as again I do not use any eyeshadow for this look.
Last on the eyes is mascara.  Mascara is probably my absolute favourite makeup and I don't think I could ever be without mascara.  I have rather long eyelashes luckily but they are rather fine like my hair so they aren't super noticeable.  And funnily enough they actually have blond tips which make them look shorter than they are.  I like to use a very black volumizing mascara which makes my lashes look thicker and fuller and plays up the natural length of my lashes as it covers the blond tips and you can then see how long my lashes actually are.  My favourite mascara for quite some time has been Maybelline Falsies in Black Drama.  I've almost always used a Maybelline mascara.  I've tried mascaras like Dior and other expensive brand names and I find that Maybelline does just as well and for a fraction of the cost.  I've never been disappointed with a Maybelline mascara but since Falsies came out I have never used anything else.
Lastly is just a big of blush to give my cheeks some colour.  I apply it directly to the apples of my cheeks and blend it up and into my hairline by my temples.  I find a shimmery peachy blush works well on me for a natural sort of look and I have been using this blush for longer than I can remember.  It is Nars Outlaw.  It has a nice golden shimmer in it which also adds a nice glow to the face.
Here is what all of this put together looks like.  And it literally does only take about 5 minutes in total to apply everything.  I like the clean polished natural look of it but yet there is just a little bit of enhancement to the eyes.  And with this I usually just wear my EOS lip balm and don't even bother with a lip gloss.  If I do happen to use a lip gloss with this look it is just a pale slightly shimmery pink that I will use.

Friday, 29 March 2013

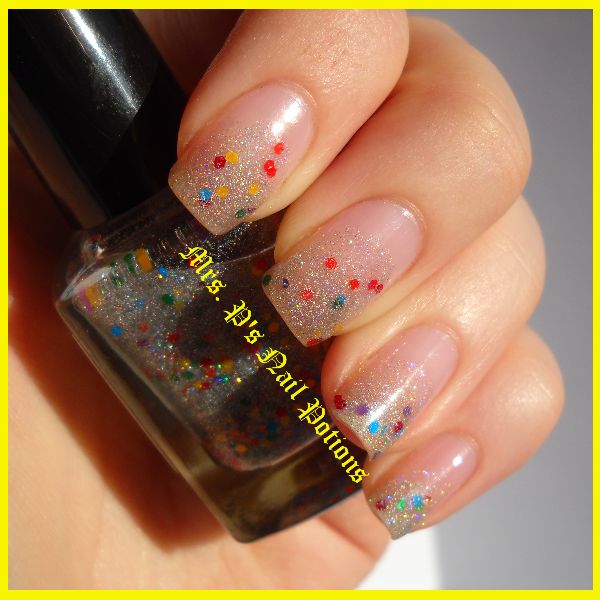
Mrs. P's Nail Potions - Follow The Rainbow

Well polish fans and indie addicts, I have created another new favourite look!!  I haven't done a glitter gradient in a while, especially just a glitter gradient over nude nails and not over another base colour.  I'm loving this simple but stunning and super sparkly look that I created using another of my own products, Follow The Rainbow.

There is not actually a whole lot to say about how I created this look.  I simply built layers of the glitter up until I achieved the desired look I was going for.  This polish is quite easy to build up because it is chalk-full of micro holo glitter which spreads nice and even and since the glitter is nice and fine you can fade it out quite nicely.  And the rainbow mix matte hexes are just a bit of fun here and there scattered over the nail beds :)  I topped everything with a coat of Seche Vite dry fast top coat and here are the results.  All photos are taken in direct sunlight.  I was so happy that the sun was out in full force that day so I could truly show off the dazzle of the micro holo glitter in this polish.


And to get a true appreciation for how dazzling this polish really is (even still not as good as in real life) check out my YouTube video of this mani.
So what do you think?  Isn't the holo glitter just fabulous?! :)  If you have Follow The Rainbow I would love to see photos of what you have done with it!

You can find Follow The Rainbow in my etsy shop.  A full-sized bottle of Follow The Rainbow is $9.00 CAD.

And don't forget, if you're in the Edmonton, Alberta, Canada area, you can make an appointment to get a manicure done with this dazzler, or any other nail potion in my collection.  Express manicures are only $10.00 and are effectively just a polish change.  Full manicures with cuticle work and shaping etc. are $15.00 to $20.00 depending on any nail art or embellishments.

If you're in the Edmonton, Alberta, Canada area, you can also book a polish party with me.  Gather your gal pals for an afternoon or evening, I will come to your home with all of my available nail potions and perform express manicures on you and all your guests and have my products out for display and purchase.  As the hostess you get your express manicure for FREE.  You will also receive 15% off any nail potions you purchase that day and you will receive bonus gifts/free product when your friends book and hold their own polish party.  Click on my "Contact Me" page to find out how to get in touch with me to book any of these appointments/events.

Thursday, 28 March 2013

Blue/Purple Shifty & Pretty As A Peacock

Hello polish fans and indie addicts!  Today's mani is another done with my own product, Mrs. P's Nail Potions.  I used Blue/Purple Shifty and added Pretty As A Peacock on the accent nails.  All photos in this post were taken in direct sunlight.

Blue/Purple Shifty is one of the potions from the Shifties Collection.  It is a colour shifting polish which shifts between a vibrant royal blue and a bright purple.  It is very shimmery and gorgeous and I did 3 coats for a nice saturated colour.  It is a sheerer formula so it can actually be used as a layering polish over other colours to add some neat colour shifting affects to any mani.  The photos DO NOT do this polish justice!  As you can imagine it is difficult to capture the colour shifting abilities of this polish on camera.


After applying Blue/Purple Shifty I chose to use one coat of Pretty As A Peacock on two accent nails over top of the Blue/Purple Shifty.  I love this combination as the blue and purple of the Shifty play perfectly with the peacock inspired coloured glitters in Pretty As A Peacock.  Pretty As A Peacock is a glitter polish in a clear base with ultra fine gold flakies, small purple and turquoise holo glitters and medium blue holo hexes.  This polish can also be used on it's own in 2 to 3 coats for full opacity depending on the thickness of your coats and makes a fabulous glitter bomb!


It's like these two potions were made for each other, even though I created them at totally different times.  The Shifties were some of the very first potions I created when I started making indie polish almost a year ago and Pretty As A Peacock I created towards then end of 2012 out of my shear love for anything and everything peacock LOL.  Heck peacock was my wedding colours and theme :D  Here's a few more photos.


And to gain a much better appreciation for the glitteriness of Pretty As A Peacock and colour shifting of Blue/Purple Shifty, check out my YouTube video of this mani.
So what is the verdict on this mani?  If you have these potions I would love to see photos of how you would combine these polishes :)
 
You can find both Blue/Purple Shifty and Pretty As A Peacock in my etsy shop as mentioned above.  A full-sized bottle of Blue/Purple Shifty is $9.00 CAD and a full-sized bottle of Pretty As A Peacock is $8.00 CAD.  Blue/Purple Shifty is slightly more expensive due to the colour shifting pigment that is used to create it, which is a little more expensive to purchase than regular pigments.
 
And don't forget, if you're in the Edmonton, Alberta, Canada area, you can make an appointment to get a manicure done with these stunners, or any other nail potion in my collection.  Express manicures are only $10.00 and are effectively just a polish change.  Full manicures with cuticle work and shaping etc. are $15.00 to $20.00 depending on any nail art or embellishments.
 
If you're in the Edmonton, Alberta, Canada area, you can also book a polish party with me.  Gather your gal pals for an afternoon or evening, I will come to your home with all of my available nail potions and perform express manicures on you and all your guests and have my products out for display and purchase.  As the hostess you get your express manicure for FREE.  You will also receive 15% off any nail potions you purchase that day and you will receive bonus gifts/free product when your friends book and hold their own polish party.  Click on my "Contact Me" page to find out how to get in touch with me to book any of these appointments/events.

Monday, 25 March 2013

Firestarter


Good afternoon all!  Today I bring you a look at a very special mood potion I have created.  I debuted it at a private little trunk show put on by The Local Social on Friday, March 22, 2013.  The following day I debuted it in my etsy shop.  This new mood potion I am talking about is called Firestarter.  Firestarter is a scattered holo jelly thermal that goes from orange when cold to yellow when hot.  It's super bright and cheery and the scattered holo is dazzling in direct sunlight and even under certain artificial light.  There is also a slight hidden golden shimmer when it is yellow.  Words cannot describe this mood potion well enough.  You have to see it to believe it!  And pics don't do it justice but they give a decent idea.

As mentioned above, Firestarter is orange when cold.  These photos are my own swatches on my own nails.  I used three generous coats of Firestarter and one coat of Seche Vite dry fast top coat.  I could have stopped at two coats of Firestarter but I went for a third for a really saturated colour.


With a change in your body temperature, as you get warmer, Firestarter turns yellow.  For photo purposes I used hot water to assist in the colour change.


As I was taking photos and the water on my nails dried, the colour was changing back to the cold colour rather quickly and the following photos were the result of that.


I then wanted to show the colour change from one extreme to the other on the nails so I got my hands completely cold and then dipped the tips of my nails in hot water.

directly after dipping the tips in hot water
a few minutes after dipping the tips in hot water, the heat began to spread to the rest of the nail bed
The next day the sun was out in all its glory so I decided to get some full sunlight shots to show off the gorgeous scattered holo as much as I could.  As you can imagine, holo is hard to capture on camera and these photos again don't do the holo aspect of this polish justice but you get a pretty good idea.  I also did not use any water or anything to change the colour of the polish, I took photos just as the polish was on me at that moment, which was mostly yellow as my hands were fairly warm but the tips remained a little bit orange still as the free edge was still exposed to the air and my nails are fairly long and the tips extend passed my fingertips.


slightly blurred photo to show off the holo

Check out my video of Firestarter!


So what does everyone think of Firestarter?

You can find Firestarter in my etsy shop as mentioned above (specialty mood potion).  A full-sized bottle is $10.00 CAD.  Firestarter is slightly more expensive than my other mood potions but that is due to the holo component as thermal pigments are expensive and holo pigment is event more expensive so I had to bring the price up a little bit from the rest of my mood potions.  However, if you enjoy my other mood potions then Firestarter will surely NOT DISAPPOINT!  I think it's my new personal fave and I can't stop watching my nails, especially in the sunlight :) LOL

And don't forget, if you're in the Edmonton, Alberta, Canada area, you can make an appointment to get a manicure done with this stunner, or any other nail potion in my collection.  Express manicures are only $10.00 and are effectively just a polish change.  Full manicures with cuticle work and shaping etc. are $15.00 to $20.00 depending on any nail art or embellishments.

If you're in the Edmonton, Alberta, Canada are, you can also book a polish party with me.  Gather your gal pals for an afternoon or evening, I will come to your home with all of my available nail potions and perform express manicures on you and all your guests and have my products out for display and purchase.  As the hostess you get your express manicure for FREE.  You will also receive 15% off any nail potions you purchase that day and you will receive bonus gifts/free product when your friends book and hold their own polish party.  Click on my "Contact Me" page to find out how to get in touch with me to book any of these appointments/events.